I was reading through my nginx logs and getting kind of annoyed that the fail2ban rules didn’t seem to be working. There were lots of transactions like sequential accesses to the login and xmlrpc pages (see this post for more info) that happened to slip through the cracks. These access patterns were too complicated to capture using simple regular expressions and trying to shoehorn them in with regex was like fitting a square peg in a round hole.
I needed a bigger hammer.
Enter: CrowdSec
CrowdSec is a piece of software that lets you monitor traffic and ban malicious IPs using very advanced detection options. It’s a niche interest software product that’s almost exclusively for people who self-hosting (like me!). For the vast majority of developers, they get this protection basically for free with cloud hosting, or sign up for a service like Cloudflare DDoS protection or firewall to handle it. I didn’t want to pay for a subscription and I don’t mind learning a new tool, so CrowdSec it is.

From the get-go, it was apparent this was going to be much more complicated than fail2ban. The CrowdSec software is split into the following components:
- Acquisition – a config file(s) that will tell CrowdSec where to find the log files to track and which format to expect
- Parsers – modules that will read each line of every log file and split it up into data (e.g. date, user agent string, IP address, etc)
- Scenarios – modules that describe a singular pattern of known malicious behavior (and how to detect it given one or more parsed log lines a.k.a. “events”)
- Security Engine – this is the main portion of CrowdSec. It takes in the events and tries to match data from all installed scenarios to generate an alert, a.k.a. an incident of malicious access from a specific IP address and then notifies the bouncers for corrective action.
- Bouncers – modules that will perform an action once a bad actor has been detected. Usually this means temporarily banning the offending IP address.
As you can see, there are many more components, layers, and levels of abstraction than fail2ban. What you get for the price of all this added complexity is the power and flexibility to detect many more sophisticated attacks, like a “slow brute force”, and protecting against specific exploits (CVE) that fail2ban cannot do.
Additionally, the security response is more sophisticated as well. The bouncer framework is pretty modular, meaning you can write bouncers with very different capabilities from each other depending on your needs. Users in the community can even make their own bouncers. This is one of the main reasons why getting CrowdSec working is so complicated.
One of the most common bouncers to install is the firewall bouncer, which will take all IP addresses that generate more than a certain threshold of alerts and add them to the server’s ban list, so they can no longer access the server. CrowdSec also has a WordPress bouncer to protect against scenarios that are targeted specifically to WordPress, like checking for the xmlrpc scenario and adding those users to the firewall ban list.
Bouncers can take many other forms. For example, one can make a bouncer for a forum app that won’t act like the firewall bouncer, but may instead add the IP address to the forum’s own ban list. Deeper application level integration, like shadow banning offending IP addresses, can be written as well. The possibilities are endless!
CrowdSec Initial Setup
I began by changing my docker config to remove fail2ban in my WordPress compose file. Instead I added a second compose file that contains containers for Nginx Proxy Manager, Metabase, and CrowdSec.
I followed two tutorials which were very helpful:
- Secure Docker Compose stacks with CrowdSec
- CrowdSec Docker Compose Guide Part 1: Powerful IPS with Firewall Bouncer
These guides contain reference snippets of their Docker compose files that were really helpful for my own integration. The installation process involved installing the CrowdSec package and daemon service on the HOST machine (read: NOT inside any Docker container) which tripped me up for a bit.
Additionally, the firewall bouncer will modify IP rules on your base computer, which is Arch Linux for me, so I needed to install a bunch of software packages, including ip-tables, to get that part working. I thought this part felt unnecessarily complicated but it is because the bouncer needs access to the server ingress rules for good reason.
Getting the CrowdSec service up and running, modifying the IP tables on the host server, and getting the firewall bouncer successfully registered from inside a Docker container took about 3 evenings. I could finally see everything appearing to work, especially after running cscli metrics show, but compared to what came after, this was just the tip of the iceberg.
CrowdSec Dashboard with Metabase
The CrowdSec tutorial for docker also includes a custom Metabase image with a pretty dashboard to track alerts and other analytics you might be interested in.
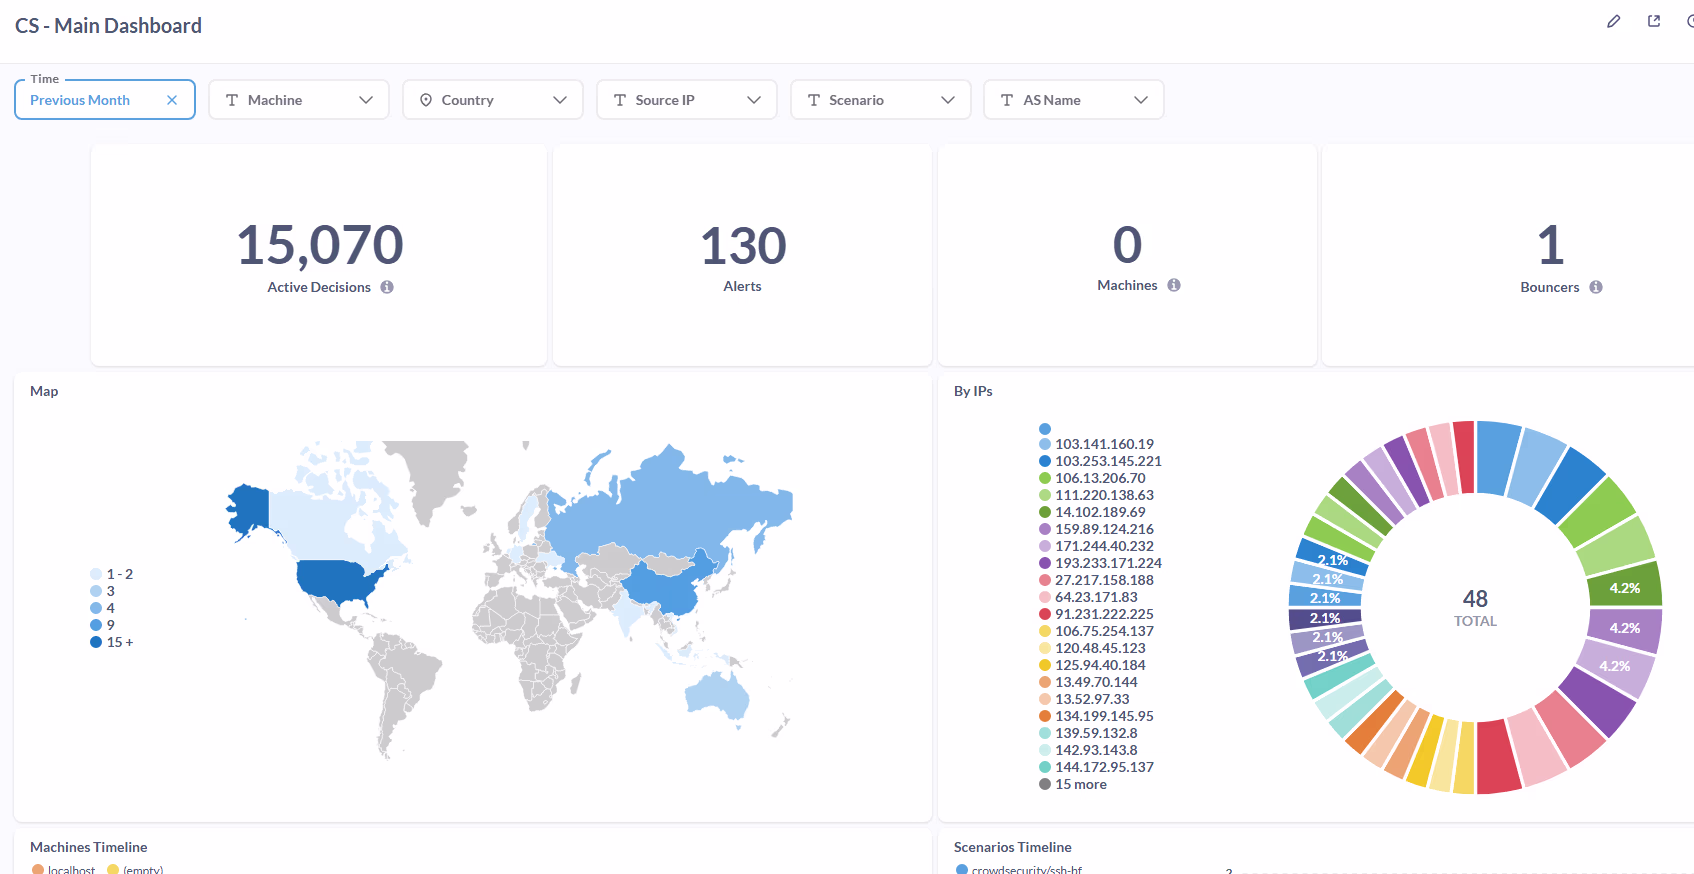
This basically shows everything that the cscli metrics show CrowdSec command line will print out, but in a very pretty graphical user interface.
Now we’re packin’ heat! This is really cool stuff and makes me feel like I have good observability into what is going on with my server protection. Just this part alone makes me feel like making the switch was worth it.
Integrating CrowdSec with Host Server’s SSH
As a little bonus side goal, I set up CrowdSec to protect my SSH endpoint, which was previously using fail2ban as well. The SSH service is running on my base Arch Linux system, not inside Docker, so that’s a little bit weird, having a Docker container CrowdSec interacting with something outside of the Docker ecosystem, but I’m willing to allow a certain amount of jank since I’m the only one who is using it for now.
This process, to add a second log source in the acquisition file, was actually quite smooth. Since I was using Arch, the SSH logs are done using journalctl. CrowdSec supports this, but requires a special journalctl syntax in the acquisition file. Also, because I was using Docker, I had to mount my journalctl log file as a volume on the container.
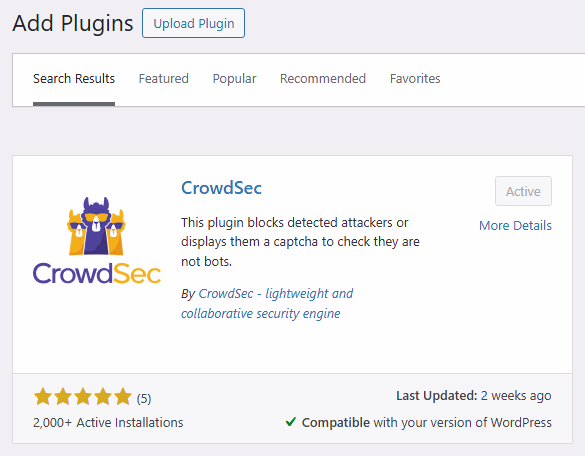
Integrating CrowdSec with WordPress
Now onto the whole point of this exercise. I installed the CrowdSec WordPress plugin through the WordPress admin dashboard. What this plugin does is use the CrowdSec database to decide who is malicious and either prevent them from seeing your WordPress blog or show a captcha before loading each page.
The documentation seemed suspiciously simple: all there basically is to do is to install the WordPress bouncer and register an API key with your CrowdSec instance. Unfortunately, this is the part where things got hairy. My setup was especially complicated due to me using Docker and having my own quirky ISP that doesn’t support NAT loopback (meaning I needed workarounds for certain things that needed to ping my own domain name). Solving these problems took a lot of luck and trial and error, and even figuring out whether or not they were problems was a struggle too.
The Long Tail
At this point, I could see a whole bunch of metrics and alerts being generated by my CrowdSec instance. Most of the detected attacks were SSH brute forces and bad user agents. But something didn’t seem right…
I could see some requests in the nginx log that should have been alerted on, but weren’t. I couldn’t get rid of this uneasy feeling and became fixated on this for longer than I care to admit. Searching for answers and examining different pieces of the system was very time consuming because I had to wait a day or two between each change for traffic to come in and then check if things started working.
I got the basic functionality of CrowdSec up and running in a few days, but getting it to where I was confident everything was fine took a month, maybe two. I eventually made a bunch of changes, most of which I’m pretty sure were necessary to correct problems with my setup.
This is the story of that journey.
Needing to trust the Reverse Proxy IP range in WordPress
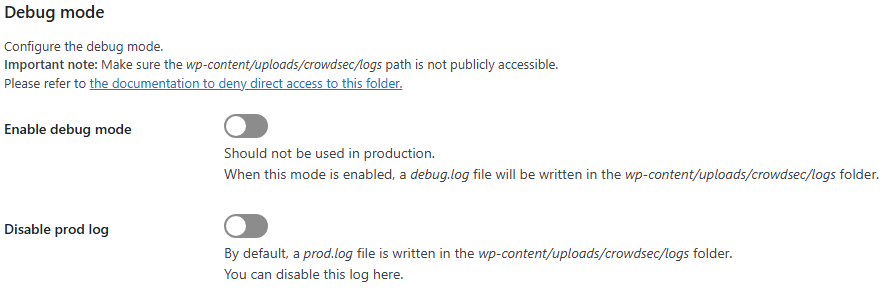
Since I didn’t see any WordPress related bans, I enabled the debug log temporarily to see if anything was working. Going into the CrowdSec WordPress plugin settings from the WordPress admin dashboard, you can enable the debug log like so:
This was quite useful to see that for every decision coming in, I found CrowdSec checking the wrong IP address for all of them.
Since I’m using a reverse proxy (Nginx Proxy Manager), the IP address wasn’t the original visitor’s address, but instead my own internal reverse proxy’s address. That’s not good! Instead of using the attackers address, it was checking CrowdSec repeatedly for my own internal container’s IP. By trusting the reverse proxy server’s (read: container instance’s) IP range, this would allow the plugin to ignore the internal IP address and check CrowdSec against the original external IP address.
The WordPress plugin has an option for this under the “advanced” section in the plugin settings, also found through the WordPress admin dashboard:

So not only does this field need to use the reverse proxy’s IP address, but since I was using Docker, this means the exact IP address will change every time I tear down and bring up the container. So I used a CIDR range (e.g. 172.18.0.0/24) to make it less like that I will have to fiddle with this field every time I reboot the server or something.
Nothing changed, but now at least the CrowdSec WordPress plugin is checking the actual IP addresses instead of 192.168.0.4 (as an example) on every transaction.
Needed to Adjust CrowdSec files for Nginx Proxy Manager
Next I figured out that lots of the nginx log lines weren’t being parsed successfully using the cscli explain utility. This was because the log format of Nginx Proxy Manager is different from nginx, so the parser didn’t know how to read those lines.
To remedy this, I installed the Nginx Proxy Manager parser from the CrowdSec hub and then set the log type from “nginx” to “nginx-proxy-manager” in the acquisition file. This made quite a difference, since approximately 60% of the log files were not being parsed, so immediately after this, quite a few different scenarios began showing up that weren’t before. Huzzah!
The presence of a reverse proxy also throws a wrench in things. Because now you need to worry about using the NPM logs or the logs of whatever is behind the reverse proxy for CrowdSec monitoring. Most of the time following the NPM logs is fine, but it depends on a case-by-case basis whether or not the destination logs should be used. For example, if the app will generate log information that is not tracked by the proxy manager, then use the destination logs. In general, if you’re not sure, you can track both log files with little issue.
Unfortunately, even at this point, the WordPress bouncer still wasn’t working! What was bothering me was that I still wasn’t seeing any WordPress related alerts, and in the CrowdSec website dashboard, it was showing that the WordPress bouncer wasn’t receiving data. I mean, the red “no data received” next to the WordPress Bouncer status seemed like a bad thing.
Needing to edit the WordPress nginx config to auto prepend file
In trying to fix the previous data problem, I tried to see if enabling “auto prepend file” mode would help. I didn’t see any tangible difference after I enabled it, but based on the description, I think it was necessary to get CrowdSec properly working.
Auto prepend file mode will paste in a certain php script to the beginning of every WordPress php file that gets requested by a user. The php script is a WordPress internal file that contains some housekeeping and method hooks to automatically run actions before a page is loaded. CrowdSec must use this functionality to perform a bouncing decision before every page load. Otherwise, without this feature, the php script will load and execute and then show up on the user’s browser, and then the bouncing decision to ban a user if needed will appear after at least 1 page load has occurred. With auto prepend file, it is possible to detect and ban users without needing for a whole request to come through first.
So I suppose this would be something that you’d want to enable by default if you can swing it.
To enable it, you need to modify the nginx (or Apache) config and add this line to the php cgi portion of the nginx config:
fastcgi_param PHP_VALUE "auto_prepend_file=/wordpress-root-directory/wp-content/plugins/crowdsec/inc/standalone-bounce.php";
For me specifically, I also had to add a script to touch this file during the docker init script, because if this file does not exist, then adding this directive will cause nginx to crash.
Needing to Fix WordPress’s Cron Task
And, at last, the pièce de résistance! I saw some ominous warning messages under the Site Health section of my WordPress admin dashboard. One of them mentioned that the cron update job failed, and I didn’t know what that meant, so it didn’t seem like something I could ignore. Additionally, the WordPress CrowdSec documentation specifically has a section to enable using system cron instead of the build in WordPress utility, so I just guessed that this might be something I’d want to do.
So it turns out WordPress by default has its own “cron” script to allow you to run actions and other script events that run in a regular interval or to schedule things in advance. Since WordPress is a website, the cron script fakes things somewhat, by running every time a webpage is requested, instead of working like it would on Linux, where there is a program constantly monitoring the time and running specific jobs when certain timestamps are passed.
This means that the “fake” WordPress cron might not run things on time if no one accesses a webpage in time. This could be a problem for CrowdSec, because the plugin needs to regularly sync with your CrowdSec engine instance. What the CrowdSec documentation recommends is to disable WordPress’s default cron mechanism, and instead use a Linux cronjob instead. That way, we can get much better asynchronous functionality.
What I found from reading the instructions is that this cronjob involves making an HTTP request to the https://<my-domain>/wp-cron.php?doing_wp_cron URL, to “manually” remind WordPress to update its scheduled jobs. Aha! Bingo, I think I found the issue here.
Remember how my ISP doesn’t allow me to ping my own external domain from my server? Well, a request to this specific URL never completes because of this reason. But luckily, I was able to switch to system cron and modify the cronjob to work around this.
First I created a new container called “wp-cron” as part of the same compose file that CrowdSec was in. This was just a base Alpine Linux image with only cron and wget installed on it. This container is on the same network as my CrowdSec and WordPress containers, so instead of using the external domain, I could use the internal container hostnames instead.
So I modified the cronjob to something like this:
wget -q -O - http://<nginx-container-hostname>/wp-cron.php?doing_wp_cron >/dev/null
This performs an HTTP request to the wp-cron script using wget, telling it not to write the output to a file and to suppress all command line output. Also note that we no longer have to use or worry about TLS protocol, and can use the http endpoint since we are on the internal Docker network.
Once this was up and running, I could see the CrowdSec plugin updating its cached decisions from the CrowdSec engine and it looked like everything started working!
╭────────────────────────────────────────────────────────────────────────╮
│ Scenario Metrics ------------------------------------------------------│
├──────────┬───────────────┬───────────┬──────────────┬────────┬─────────┤
│ Scenario │ Current Count │ Overflows │ Instantiated │ Poured │ Expired │
├──────────┼───────────────┼───────────┼──────────────┼────────┼─────────┤
│ crowdsecurity/http-bf-wordpress_bf_xmlrpc ______│ _ │ _ │ 17 │ 17 │ 17 │
│ crowdsecurity/http-wordpress-scan ______________│ _ │ 2 │ 10 │ 19 │_ 8 │
│ crowdsecurity/http-wordpress_user-enum _________│ _ │ _ │_ 7 │ 12 │_ 7 │
│ crowdsecurity/http-wordpress_wpconfig __________│ _ │ _ │ 26 │ 26 │ 26 │
╰──────────┴───────────────┴───────────┴──────────────┴────────┴─────────╯
The metrics are showing WordPress scenarios matching, though not frequently enough to warrant a full-blown alert. CrowdSec defaults to a “leaky bucket” approach, where scenarios need to happen more than a certain threshold of times inside a small time window before CrowdSec will mark the offender as needing to be handled by a bouncer.
Man this ISP thing is really killing me. Almost every system I’ve set up so far needed some modifications to work around this unsupported NAT Loopback thing. I kind of wish all of this context and information I wrote in this blog post was included on the WordPress CrowdSec documentation, but I’m not exactly sure how that would work, since most of this stuff was unique to my own situation…
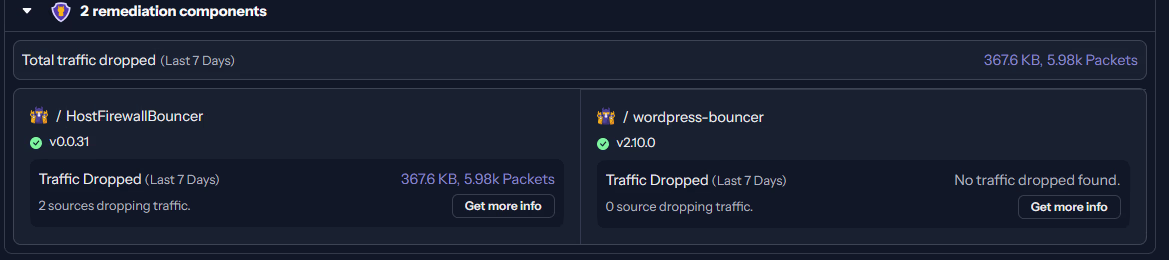
But FINALLY! I’m seeing data being passed back and forth and it appears that the WordPress plugin is now working as expected. Feels good, man.
Some Stats (for Nerds)
After running CrowdSec for a couple months, I’ve managed to collect a small dataset. Consider this a little continuation of my previous post about all the people trying to hack into my server.
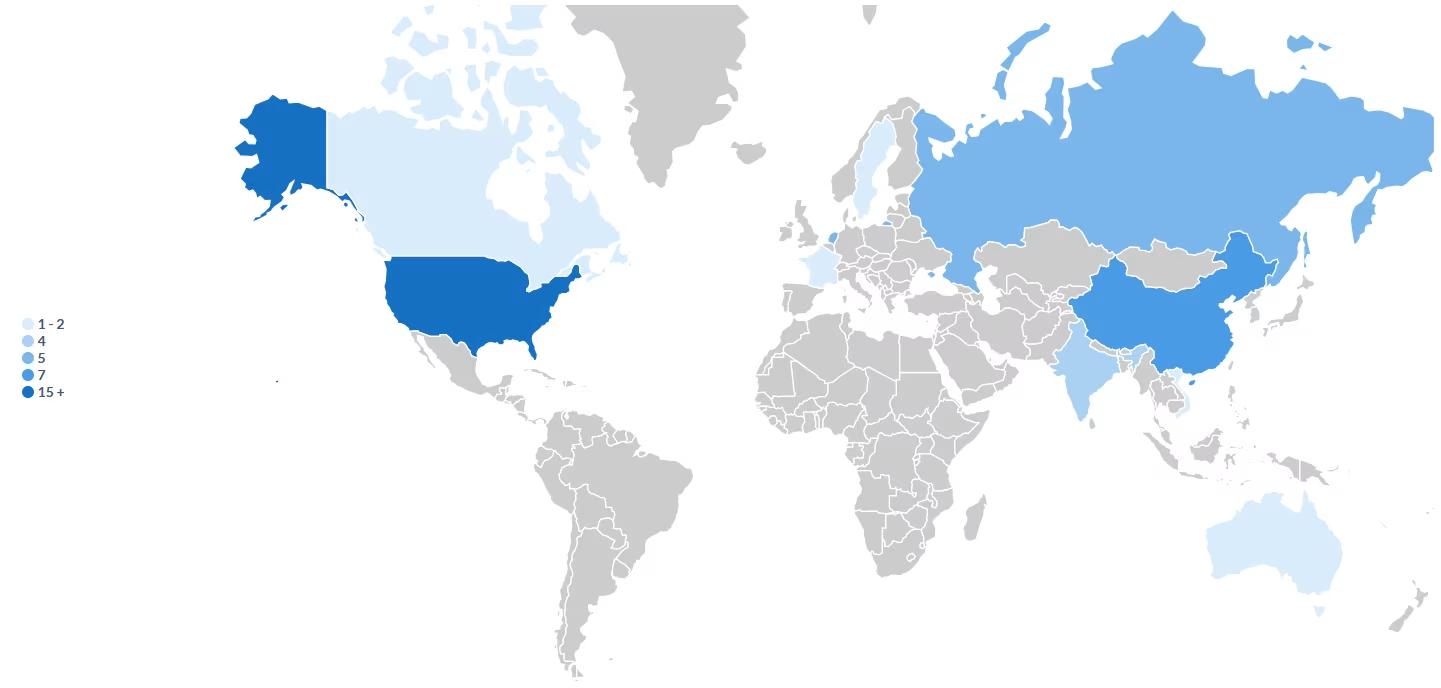
There’s nothing really surprising here. You have the usual suspects–Russia, China, India. Surprisingly enough, lots of incidents originating from the Netherlands and Germany. I suspect it’s because Hetzner is a very cheap and popular VPS hosting company that is based in Germany.
I am seeing that the most attacks are coming from within the United States (not surprising), and a few from Canada as well.
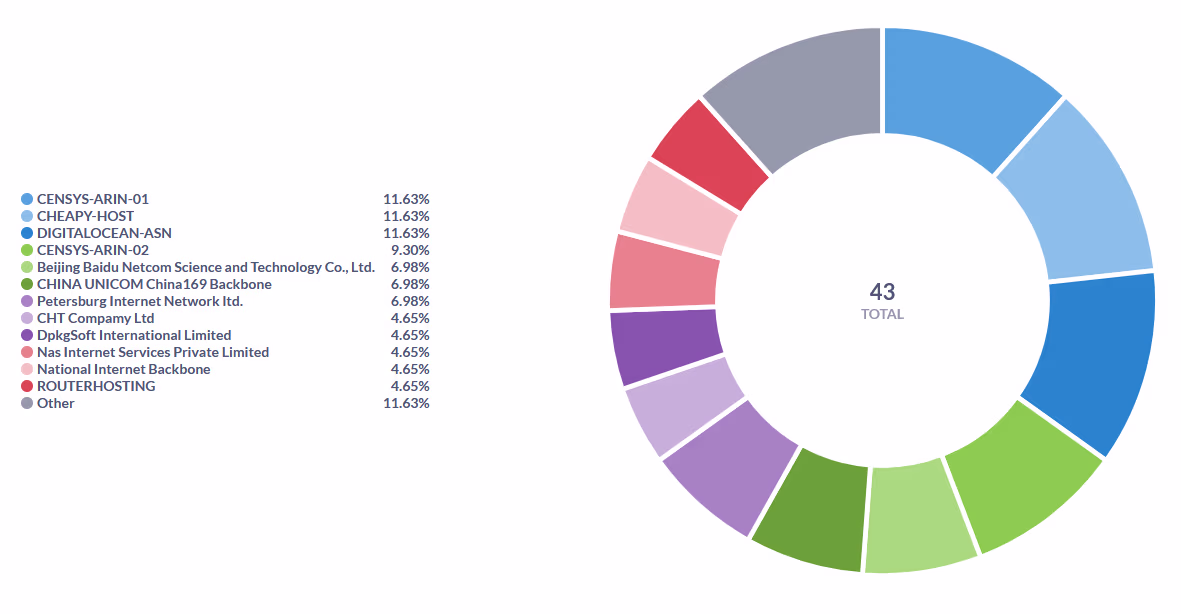
If I break down all bans by user agent string, you get some wild characters. Lots of gibberish and foreign looking names from China and India. “CHEAPY-HOST” is funny. I wonder what the thought process behind naming that was?
Sometimes you get a really interesting one, like “ibrahim tufek”. It looks like some dude wrote a bunch of spam bots and put his own name in the user agent string. LOL 😂
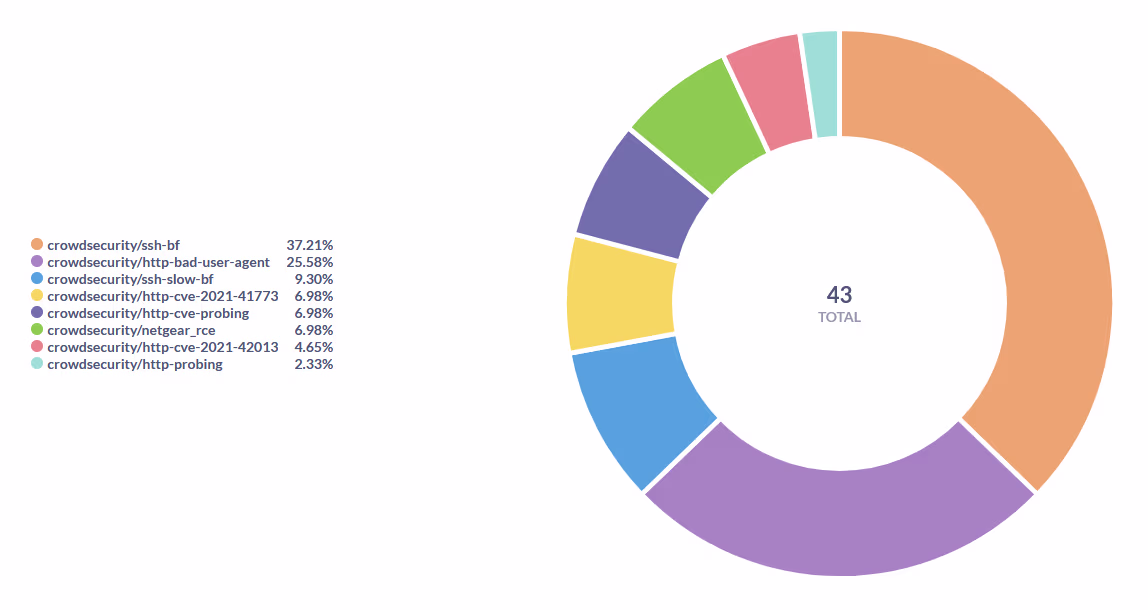
And most interestingly (to me, at least), you can see a breakdown of all tasks by scenario. Overwhelmingly they are SSH brute force attempts and bad user agent strings. That makes sense. Hacking SSH is probably the most bang for your buck. Too bad, hackers. I have a public key setup. You’ll NEVER get it! Mwahahahahaha
To be honest I am surprised that, to date, there has only been a single WordPress related alert. Kind of a bummer actually, because I feel like I’m not protecting anything. But I believe the scenarios are being encountered, but not reaching the threshold that would trigger bans yet.
Oh well. This is not a huge waste of time, though. I believe this is happening because I am not actually get too much malicious traffic towards my WordPress instance so far. Perhaps in the future, this will grow if the blog gets more popular?
Closing Thoughts
Man, okay, so it didn’t really sink in how much of a tremendous pain in the ass this was until I read everything in this blog post all in order. Two months of faffing around, trying to get this working, and it also not being particularly interesting work… This was tough.
I will say this: CrowdSec is not for everyone, but if you are going down the self-hosted route, then you are putting in more effort into this esoteric field than most and, in that case, CrowdSec would be an invaluable piece of your toolkit.
I’m glad I did all this, and I hope I don’t have to do anything this tedious ever again.
Cory out.